
Photographing the aurora is hard
Straight talk: I don’t know how to photograph the aurora. Or at least, I didn’t prior to 2024. But over the course of two incredible solar storms this year (May 10th and October 10th), I gave myself a crash course in aurora photography. And I can tell you one thing for sure: shooting the aurora is damn hard!
You start with the usual challenges of night photography and then add in an unpredictable, fast-moving subject that is not always visible to your bare eye. It’s hard to think of a subject that pushes you and your camera to the limit like the aurora does.
I started my first aurora shoot of the year in a panic, not knowing where to go or what to do. And I quickly learned that panic is not your friend, nor will it result in good images. So I calmed down, learned a bunch, experimented, and finally came home with photos I was happy with.
Here I’d like to share with you the 5 most important lessons I learned as a newbie aurora photographer so that you too can be better prepared, enjoy your next aurora shoot even more, and come home with killer images.
1) Download an aurora prediction app and follow experts
If you want to shoot the aurora, you have to know when it is going to occur. The first thing to do is download an aurora prediction app. There are many available, both free and paid. At an absolute minimum you need one that will show you predicted Kp, which is the strength of the solar wind impacting Earth’s magnetic field. Higher numbers (on a scale from 0 to 9) indicate a stronger storm, as well as give you a rough prediction of where the aurora might be visible. The higher the Kp, the more the aurora will extend into lower latitudes. For reference the May 10 storm was Kp 9, and October 10 was Kp 8.3.
If you want to take it to another level, your app should also show you Bz, which indicates where the solar wind impacts the Earth’s atmosphere. Positive numbers indicate the particles will mostly impact the southern hemisphere, negative numbers mean the particles will impact the northern hemisphere, and 0 means both. This is helpful in predicting how good the chance of seeing an aurora is where you are located.
Good aurora apps will also let you set up alerts when the solar wind reaches certain conditions. For example, here in Lone Pine I have mine set to go off when the Kp is above 7.
However, if you want to avoid the jargon and sciency stuff, I recommend that you simply follow aurora nerds on Instagram. There are experts out there who love providing insight into aurora activity and will often give you clear indications of when you should go out to see the activity.
One of the best I follow is Mark Stewart: https://www.instagram.com/topomountainman
Here’s a great website as well from the University of Alaska with an easy-to-understand forecast: https://www.gi.alaska.edu/monitors/aurora-forecast
2) Have a Plan A, B, C, and D in advance
One of the best ways you can be prepared to photograph the aurora is to know your compositions in advance. Although the shape and color of the aurora is somewhat unpredictable, we generally know where it is going to appear in the sky. If you live in the northern hemisphere generally speaking it will appear in the northern sky, and in the southern hemisphere it will be in the southern sky. (Of course if you live in really high latitudes it can appear anywhere in the sky).
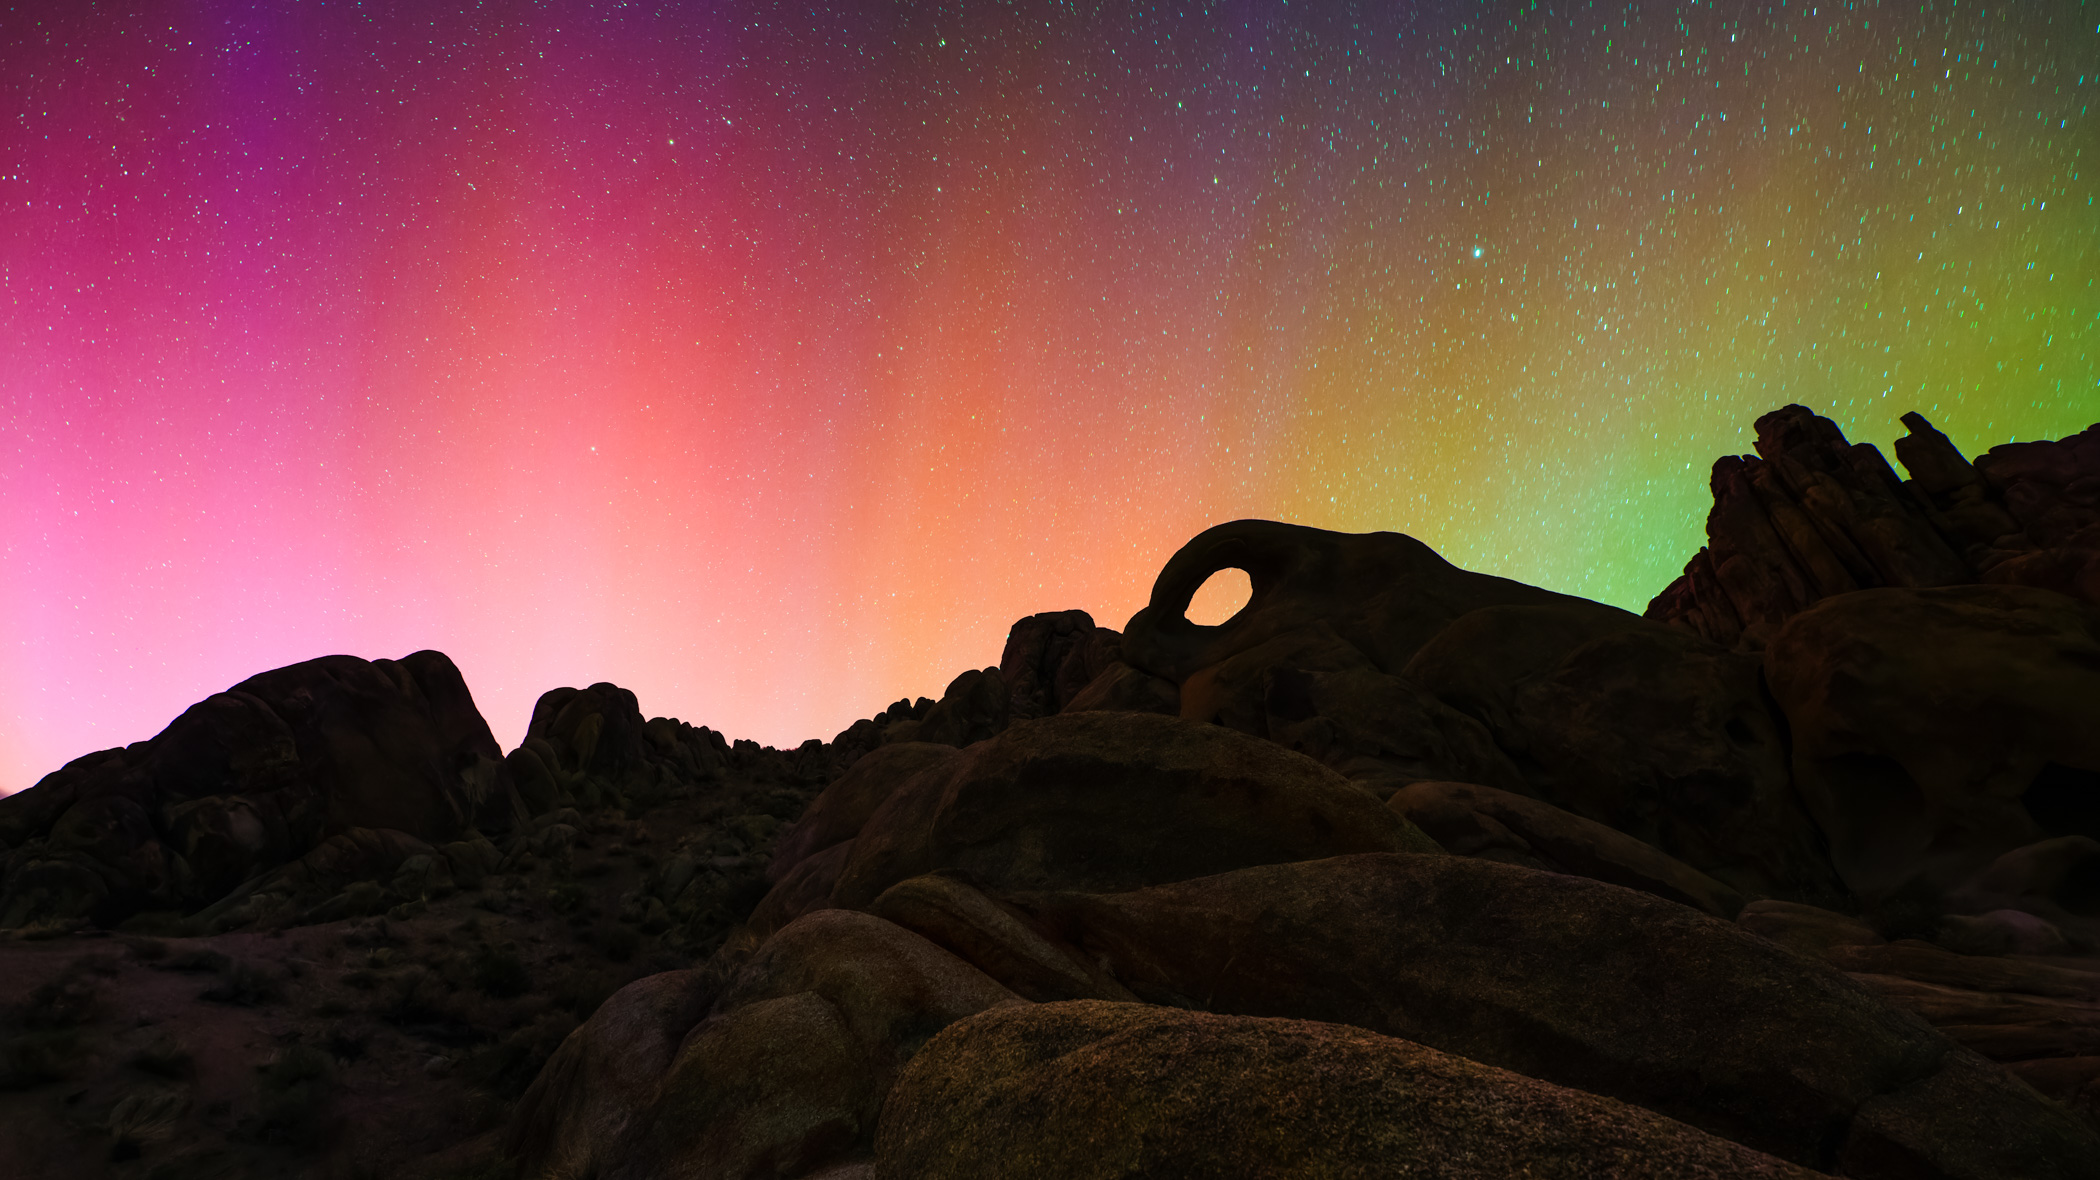
So for us northern hemisphere dwellers, make a list of all north-facing compositions you can think of to the northeast, north, and northwest. That way when there’s a good chance for aurora you already know where to go instead of trying to think of something good on the fly and panicking. Because that’s how you end up with photos of the aurora over a garbage dump instead of over a beautiful mountain. For example, during the May 10th aurora, I took a quick test shot when I arrived in the Alabama Hills and saw that the best aurora was to the northeast. I knew that I could shoot this arch with the NE sky behind it and so was able to quickly get to this spot.
The more potential compositions you have, the better your options will be depending on where the aurora appears, as well as how high in the sky it is.
3) Know your camera like the back of your hand
I can’t think of a better testing ground for your camera knowledge than shooting the aurora. If it’s an active storm, you will need to be able to quickly take test shots to see where the aurora is appearing. You will very likely be changing compositions and focal lengths repeatedly. You will need to zoom to 100% to check and double check focus. You will need to change your ISO and shutter speed quickly depending on the aurora activity and ambient light (if there’s a moon for example).
These kinds of quick technical changes would test your camera agility even during the day, but at night it’s another world altogether. If you don’t know your camera like the back of your hand you will find this to be an exercise in frustration. LEARN YOUR CAMERA, and know it well enough you can do it in the dark.
Here I have a resource to help you: Download my free eBook on the camera settings and skills you need to master to be fluid and confident in the field.
4) Try lots of shutter speeds
One thing that greatly impacts how the aurora appears in your photos is shutter speed. If the aurora is really active and changing quickly, you need a short shutter speed to capture that. But it’s always a compromise, because the shorter your shutter is, the less overall light you will gather, meaning your photos will be darker and noisier. Conversely, if you use a longer shutter speed, you’ll have a cleaner, brighter image, but you run the risk of the aurora turning into a blur without any definition. You may also end up with unwanted star trails.
My advice is to use the longest shutter speed you can that still allows you to maintain the definition of the aurora. Sometimes you’ll have to keep your shutter speed to just a second or two. Other times the aurora will be stable enough that you can shoot as long as 15-30 seconds without losing definition. But each aurora is different, so you’ll have to experiment with the best shutter for each case.

5) Keep shooting, you never know when the show is over
Because the aurora is constantly changing, brightening and dimming, it’s hard to know when the show is over. Sometimes the lights will dim down for an hour or two, then flare up unexpectedly for 5 minutes. And you don’t want to miss those 5 minutes!
The best thing to do is to simply wait calmly and take a photo every few minutes to see what’s happening. This is especially true when you can’t see the aurora with your bare eye and you need your camera to pick up the colors and shapes. And though it can be a daunting prospect to stay out in the cold waiting for something that might not happen, I found that being prepared made all the difference: Dress warmly, bring a chair, a book, some water, and get rid of any expectations of how long you might shoot. That way you are most prepared for any change in aurora activity.

Shooting the aurora is extremely fun and exciting, if you’re well prepared. Utilize these 5 tips to prepare for your next aurora shoot and you will surely enjoy the experience as much as possible.
—
Do you have any great tips that have helped you photograph the aurora? Leave them in the comments below.
The post How to Photograph the Aurora: 5 Things I Learned as a Newbie appeared first on Joshua Cripps Photography.